Quickstart Tutorial
This guide provides a detailed step-by-step walkthrough to help you get started with Gitspaces.
Prerequisite
Ensure that the CDE module is enabled in your Harness account before proceeding. For assistance, contact: cde-interest@harness.io
Create a Gitspace
We’ll now create a Gitspace, we’ll use a sample application from our public GitHub repository: Demo Node.js App. This is useful for Harness-Hosted Gitspaces.
-
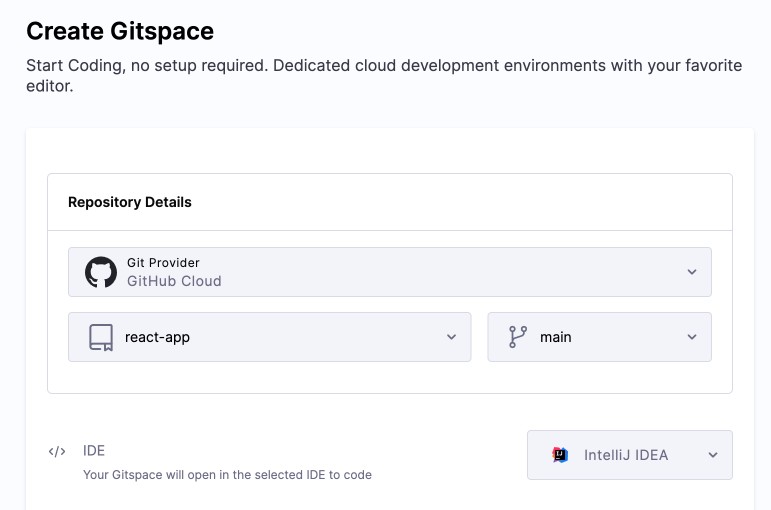
Open the Harness UI and go to Gitspaces from the left sidebar.
-
Git Provider: Select your preferred Git Provider (see supported Git Providers).
-
Repository URL: Enter your Repository URL:
- For cloud providers: use the public GitHub repository or your fork (use the full HTTPS format:
https://git-provider.com/org/repo). - For on-prem providers: provide the internal repository URL.
- For cloud providers: use the public GitHub repository or your fork (use the full HTTPS format:
-
Branch: Enter a branch name, or use the default
main. -
IDE: Select your preferred IDE (e.g., VS Code Desktop). Check IDE prerequisites beforehand.
-
SSH Key: Required for all IDEs except browser-based ones. Refer to the SSH key setup guide.
-
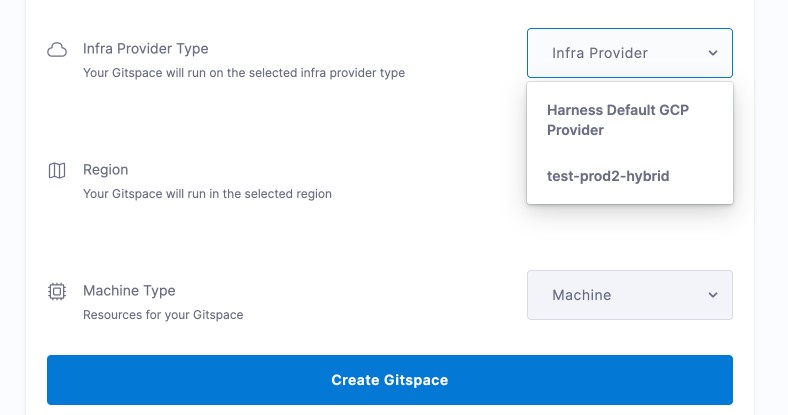
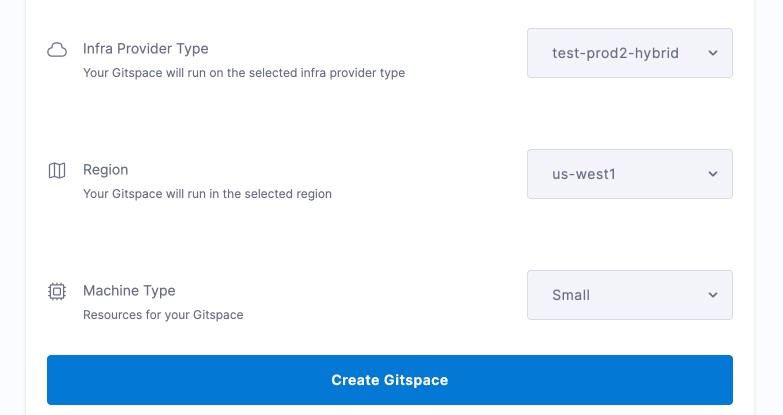
Infra Provider Type:
- Harness Hosted → Select Harness Default GCP Provider
- Self Hosted → Select your previously configured infrastructure
-
Region:
- Harness Hosted → Choose from pre-defined regions (see supported regions).
- Self Hosted → Select from your configured list (see how).
-
Machine Type:
- Harness Hosted → Choose from available machine types (see supported machines).
- Self Hosted → Choose from the machine types configured in your infra (see how).
-
Click Create Gitspace.
Once your Gitspace is active, you're ready to begin development!
Develop in Your GitSpace
Let’s run the sample app and try making a code change:
Run the App
-
Open a new terminal.
-
Run the app using:
npm run dev -
The app runs on port
3000. A pop-up in your IDE will display a link to open it in the browser.
If you don’t see the pop-up:
Use Port Forwarding:
- Go to the Ports panel in VS Code and click Forward a Port.
- Enter
3000, press Enter. - Open https://localhost:3000 in your browser.
Learn more about Port Forwarding.
Make and Commit Changes
-
Ensure you created the Gitspace from your forked repo.
-
Modify
haikus.json— for example, delete a block like:{
"text": "traffic in bangalore,\ncondiser fying to work",
"image": "canary-flying.png"
} -
(Optional) If OAuth is not already set, configure Git:
git config --global user.email "you@example.com"
git config --global user.name "Your Name" -
Use Source Control in VS Code to:
- Stage changes (click
+next to files) - Add a commit message and click Commit
- Click Sync Changes to push
- Stage changes (click
GitHub will prompt you to authorize the push - complete it, and your changes will reflect in your fork.